Blogs, Integrations/EDI,
Blogs, How-to
Date
24 August, 2022
Reading time
5min. reading time
To succeed in logistics, it is important to get all information to the right place at the right time as quickly as possible. Keeping your customers informed, and by extension theirs, is paramount at all times. This also applies to your automatic notification via e-mail, whether it is a simple packing slip, shipping confirmation or stock report. Getting these documents to the right stakeholders is vital. Whether there are 1, 10 or 100.
For this reason, the mail templates have been created at Boltrics, all mail contacts are automatically loaded from the source of your preference and provided with a message, so that you can continue to focus on all other processes that make your company so strong.
The strength of the mail templates in 3PL Dynamics lies in the flexibility it offers in terms of source. This in combination with our existing document handling. All you need to do is link a relevant stakeholder to a “type of person”. This can be a customer, supplier, carrier or any other desired type of contact. This person will then automatically be provided with all the information you want at the moment that you think it is important.
It sounds ideal, but how do you manage this yourself? You can already set up a group in 7 steps. To help you get started quickly, we have prepared a manual for you. Here you will find all the information to configure an advanced automated e-mail message. This is activated via the status template of a document.
Before you get started
The guide is written as simple as possible, but keep in mind that some basic knowledge of Business Central is required for success. Are you in doubt? Then do not continue with the steps and ask a colleague or contact us via the customer portal.
Before you implement anything in the PROD at all, we strongly advise you to test it in the RAPP first.
Go to “Steps” and create a new step. Give it a proper name and write it down for later reference. Click “functions” in the ribbon and select “Function”. Add the following information:
Next click on the hyperlinked Parameter number. Fill in the necessary parameters. Leave the parameter “SMTP_BACKGROUND” empty for now, just until we finished testing.
Go to “Status Templates” and select the designated order type. Select the status in which you want the email to be triggered e.g., “65-Transport Docs” and add a new parameter. Select Object-ID “11172845” and Function-ID “67 “and leave the line to save. Click “yes” under the column parameters.

Next enter the value of the step code which we created in the previous step.
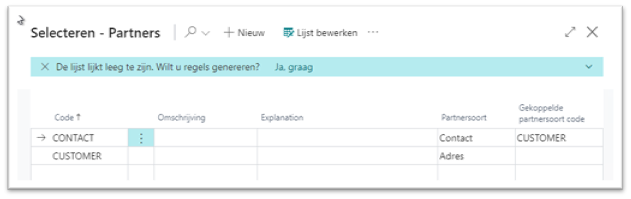
Go to “Partners” and add new partner codes. Select the proper source table under “partner type” (mandatory) and coupled partner type (if required). Please fill the partner code from step one in the step parameters, if you haven’t done so yet.
Go to “WMS Party Template” and create a new code through the ribbon. Create a new code through the ribbon, once again it’s free to be named. Please check 3.1 for advice. On the WMS Party subpage, select the template you just created. We used the order type as a reference:

Now connect the partner codes to their respective fields:

Go to “Order type” and select the order type in question. Click on “edit” in the ribbon. Select the created “WMS Party Template” under the Partner Template Code.
Congratulations! Most of the configurations have been completed by now, all you have remaining is to test its functionality and update your database. This to provide this new functionality with the necessary information and enable it to function.
Create a new order of the type we have used throughout this exercise e.g., “STD”. When enabled, the fact box “Partner“ should now indicate all created partner codes along with the general information of each partner. Now trigger the status in which we configured the step to be triggered.
If all went well, you should now see an email form created based on your email template (selected in chapter one) which “recipient address” should be filled with the email address(-es) of the partner code you selected in step 1.
If you have fully tested all functions, do not forget to enable the parameter “SMTP_BACKGROUND” if you want such functionality.
There is also one last detail that has been overlooked. When entering e-mail addresses on master data, often multiple addresses can be added via a “; “(note the space) as a separator between email addresses.
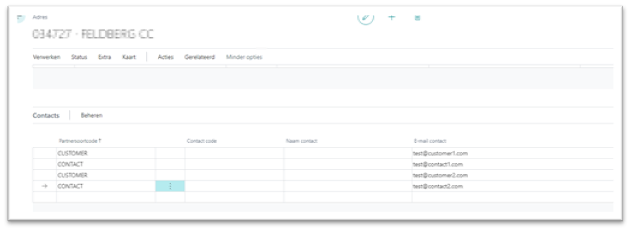
The address card has another special feature, because here you can set each individual partner code with its designated contact person based on that address:
Do you want to get started with mail templates? Download the step-by-step plan here. This way you always have it at hand.
Can’t figure it out? Please contact us via the customer portal. Our colleagues are ready for you!